Monday, June 10, 2013

Coconut Curry Tofu


Ingrediants
 

Directions

  1. Remove white parts of green onions, and finely chop. Chop greens into 2 inch pieces.
  2. In a large heavy skillet over medium heat, mix coconut milk, 3 tablespoons soy sauce, brown sugar, curry powder, ginger, and chile paste. Bring to a boil.
  3. Stir tofu, tomatoes, yellow pepper, mushrooms, and finely chopped green onions into the skillet. Cover, and cook 5 minutes, stirring occasionally. Mix in basil and bok choy. Season with salt and remaining soy sauce. Continue cooking 5 minutes, or until vegetables are tender but crisp. Garnish with remaining green onion.

Pretty simple right? You can experiment with spices as much as you want to find the right level of taste you prefer. I like to add shaved coconut skin sometimes to add more texture.

Monday, June 3, 2013

"To Die For" Fettuccine Alfredo

To Die For Fettuccine Alfredo Recipe

Ingredients

Original recipe makes 6 servings


Candy Corn Cheesecake Mousse


Candy Corn Cheesecake Mousse
This recipe yields a sweet and fluffy, light cream cheese flavored dessert.
1 package (8 oz.) cream cheese
1/2 cup powdered sugar
1/4 cup milk or cream
1 teaspoon vanilla
1 small container (8 oz.) Cool Whip, thawed
orange and yellow food color
candy corn (for garnish)
Directions ~
Beat cream cheese in the bowl of an electric mixer until fully smooth. Slowly add powdered sugar, then milk (or cream). Add vanilla. Continue mixing. Beat about 1 minute on medium to medium-high speed. Fold cool whip into cream cheese mixture, and stir until fully combined.
Scoop about 1/3 of the Cheesecake Mousse into a bowl, and color orange. Color another third of the mixture yellow. Leave the remaining third white. One color at a time (starting with yellow), scoop mixture into a piping bag or large ziplock bag, and squeeze a layer of the Cheesecake Mousse into small dessert dishes of your choice. Repeat with orange and then white Mousse.
Refrigerate 30 minutes (or up to 1 day) before serving. Garnish with candy corn if desired.
Recipe yields 4 moderate servings or 6-8 mini servings.
Recipe Source: Glorious Treats
Sugar Free Option: In the past, I have adjusted this recipe to be sugar free, with good results. Simply substitute 1/3 cup Splenda for the powdered sugar, and replace regular cool whip with sugar free cool whip. Omit candy corn garnish.
Recipe options: This general concept could be created using vanilla pudding or white chocolate mousse (from a mix or from scratch).


Chocolate Mint Chip Cupcakes {in a jar}

Chocolate Mint Chip Cupcakes {in a jar} - by Glorious Treats
Bake up your favorite Chocolate Cupcake mix or recipe. Bake the cupcakes in paper wrappers (as you would normally). Allow the cupcakes to cool while you make the frosting.

Mint Chip Frosting-
3/4 cup (1 1/2 sticks) unsalted butter
4 oz (1/2 block) cream cheese
4 cups powdered sugar
4-6 Tablespoons heavy cream
1/2 teaspoon vanilla extract
1 1/2-2 teaspoons pure peppermint extract
1-2 drops green food coloring (I used Americolor mint green)
3 oz. semi-sweet chocolate (in bar form), chopped.

Directions-
1.) Chop the chocolate and set aside (I would not recommend chocolate chips, as they will be a bit too chunky). Chop so that each piece of chocolate is no larger than a mini chocolate chip. Set chopped chocolate aside.
2.) In the bowl of an electric mixer, beat the butter until smooth.
3.) Add cream cheese, and continue to beat until smooth and fully incorporated.
4.) Begin adding powdered sugar, one cup at a time (while mixing). After you’ve added 1 cup of powdered sugar, add a tablespoon of heavy cream.
5.) Continue adding powered sugar and heavy cream alternately, until you’ve added all 4 cups of sugar, and 4 tablespoons of cream.
6.) Continue mixing, and add vanilla and 1 1/2 teaspoons of mint extract. Once incorporated, stop mixer and taste frosting for minty-ness. Decide if you’d like to add an additional 1/2 teaspoon mint.
7.) Add 1 or 2 drops of green food coloring and blend until fully incorporated.
8.) Continue to beat an additional 30 seconds to 1 minute. As needed, add an additional 1-2 tablespoons of heavy cream.
9.) Add most of the chopped chocolate, reserving about 1/3 of it for garnish. Beat just until incorporated.
Fill (2/3 full) a large piping bag fitted with an extra large round tip , or add frosting to a large ziplock type bag and snip off one end (to make an opening about 1/2 inch diameter).
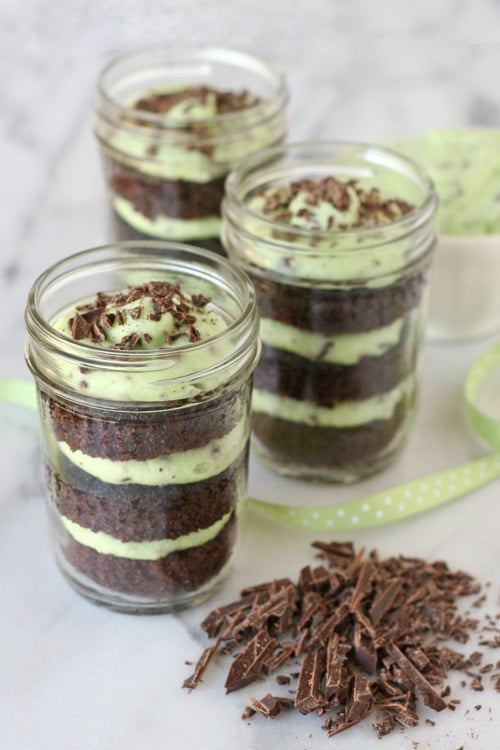
Begin assembly by removing the wrappers from the cupcakes, and cut each cupcake in half (horizontally).
Add 1 cupcake half to the bottom of several jars, then squeeze a layer of frosting on top. Be a bit stingy with the frosting, or it will overpower the slice of cupcake.
Continue by adding another cupcake half, and another layer of frosting.
Add one final cupcake half, and a final layer of frosting. Garnish with some of the reserved chopped chocolate.
So each jar should have 3 cupcake halves (1 1/2 cupcakes).
Serve immediately, or cover jars with lids and keep in the refrigerator up to 3 days.

Pineapple Upside Down Cupcakes

Pineapple Upside-down Cupcakes - by Glorious Treats
How to make Pineapple Upside-Down Cupcakes - by Glorious Treats

Print

Pineapple Upside-down Cupcakes

Make this recipe using a jumbo cupcake pan for individual servings, or in a 9"x13" pan for a classic cake.
Yield: 12 Jumbo cupcakes, or (1) 9"x13" pan

Ingredients:

Brown Sugar Glaze
6 Tbsp. butter
2 Tbsp. light corn syrup
1 cup (packed) brown sugar
12 (canned) pineapple slices (you'll need 2 cans)
6 maraschino cherries (each cut in half)
Cake
2 1/2 cups flour
1 tsp. baking powder
1/2 tsp. baking soda
1/2 teaspoon salt
3 eggs
2 cups sugar
1 cup oil (vegetable, canola, etc)
2 tsp. vanilla extract
1 cup sour cream (any fat content)

Directions:

Directions (pictured above)
1. Prepare 2 JUMBO cupcake pans by greasing the molds, and then lining just the bottoms with paper liners. I used Jumbo cupcake liners, and cut them down so the liner just fills the bottom (and up the side just a bit). The liner will just help keep the pineapple and glaze in tact as you remove the cakes from the pan.
2. Prepare the pineapple slices by cutting out a notch of pineapple (as pictured above). This allows the pineapple to sit nicely in the bottom of the cupcake pan. Cut one pineapple slice and then place it in your pan to get an idea of the size piece you need to remove.
3. Prepare the brown sugar glaze by combining the butter, corn syrup and brown sugar in a small saucepan. Heat until the butter and sugar are melted, and the mixture is smooth. Set aside to cool.
4. Prepare the cake batter. In a large bowl add the flour, baking powder, baking soda and salt. Whisk to combine, then set aside.
5. In the bowl of an electric mixer, add eggs and beat 15 seconds. Add the sugar, and continue to beat until the mixture thickens and is a light in color.
6. While mixing on low speed, add the oil and vanilla and mix until well blended. Add sour cream, and mix to combine.
7. Slowly add the flour mixture and mix just until the flour is fully incorporated.
8. Assemble cakes for baking by adding 1-1/2 tablespoons of the brown sugar mixture to the bottom of each (lined) cupcake mold. Top glaze with a slice of pineapple and half of a maraschino cherry.
9. Pour (or scoop) the cake batter on top of each pineapple slice, filling each cupcake mold 2/3 - 3/4 full (do your best to evenly divide the batter between each cupcake).
10. Bake cupcakes in a preheated 350*F oven for about 25 minutes (or until a toothpick inserted in the center of a cake comes out clean, or with a few moist crumbs).
11. Allow cakes to cool about 5 minutes, then run a knife along the edges of each cake to losen it from the pan. Flip over the entire pan, onto a baking sheet. Remove the paper liner, and serve.
Cakes can be served warm, or at room temperature.
Recipe Source- Glorious Treats
Notes - If you only have one jumbo cupcake pan, simply bake one pan at a time, then repeat the assembly for the second batch.
If desired, you could prepare this recipe using the pineapple and brown sugar glaze listed, but replace the cake recipe with a boxed mix yellow cake (prepare the cake batter as directed on the box).
These beautiful and delicious little cakes can be made up to two days in advance.
Pineapple Upside-down Cupcakes - by Glorious Treats

Wednesday, May 8, 2013

GimBap (Korean Sushi)

76_gimbap

Gimbap, or Korean sushi, is a delicious Korean appetizer and finger food. This recipe is perfect for vegetarians since it does not use any meat or fish, although many popular Korean gimbap recipes do use beef, fish cake, and even kimchi. The colorful arrangement of ingredients in this gimbap recipe (green spinach, yellow eggs, orange carrots, brown gobo, yellow daikon, white rice) make this dish look just as delicious as it tastes. Gimbap pairs well with various types of kimchi including mul kimchi (water kimchi) and buchu kimchi (chive kimchi).
Ingredients
  • 4 cups white rice
  • 12 sheets dried seaweed
  • 3 gobo root
  • 2 carrots
  • 1 bunch spinach
  • 1 yellow daikon strip
  • 6 eggs
  • 2 tbsp olive oil
  • 1 tsp sesame seed oil
  • 3 tbsp salt
  • 4 tbsp white granulated sugar
  • 2 tbsp vinegar
  • 2 tbsp water
  • 1 tbsp brown sugar
  • 1 tbsp soy sauce


Instructions
Gobo Root & Carrot Cooking Instructions
  1. Peel gobo strips, cut off ends, slice into 1/4-inch strips, and rinse under cold water.
  2. Peel carrots, cut into halves, then into 1/4-inch strips, and rinse under cold water.
  3. Peel carrots
  4. Boil a large pot of water and add 1 tbsp salt. Blanch gobo strips for 3 minutes but do not overcook them since they will be sauteed later. Add carrot strips and blanch for another 2 minutes. Turn off the stove and let strips sit in hot water for 1 minutes. Strain and set aside.
  5. Boil pot of water and add 1 tbsp salt
  6. Heat a small frying pan on high heat. Add gobo strips with a splash of water, 1 tbsp soy sauce, and 1 tbsp brown sugar. Sautee gobo for 3 minutes on medium heat and cook covered for another 2-3 minutes until soft.
  7. Heat small frying pan on high heat
Daikon Preparation Instructions
  1. Slice yellow daikon into 1/4-inch strips and set aside.
  2. Yellow daikon<
Spinach Cooking Instructions
  1. Cut off ends of spinach. Do not cut the spinach leaves in half since longer leaves are better for rolling gimbap. Wash spinach several times until all dirt is removed and strain.
  2. Cut off ends of spinach
  3. Boil a large pot of water and add 1 tbsp salt to retain the color of the spinach. Add spinach to boiling water and turn off the stove immediately. Strain the blanched spinach and squeeze out any excess water by hand.
  4. Boil water and add 1 tbsp salt
  5. In a large bowl, add 1/2 tsp salt and 1 tsp sesame seed oil. Mix thoroughly by hand and set aside.
  6. Add 1/2 tsp salt to spinach
Egg Cooking Instructions
  1. Crack 6 eggs into a large mixing bowl. Add 1/2 tsp salt and mix thoroughly with a fork.
  2. Crack 6 eggs into mixing bowl
  3. Heat a small frying pan on medium heat and coat with olive oil. Slowly pour the eggs into the hot frying pan and heat one side for 1-2 minutes until it is evenly cooked. Fold one side of the eggs over with a spatula and form into the shape of an omelette. Continue folding the eggs over and cook for another 1-2 minutes until both sides of the omelette are golden brown and the omelette is cooked throughout.
  4. Heat frying pan and coat with olive oil
  5. Slice omelettes into 1/2-inch strips and set aside.
  6. Slice omelette into 1/2-inch strips
Gimbap Ingredients
  1. Place ingredients nicely on a large tray.
  2. Gimbap ingredients on tray
Rice Cooking Instructions
  1. Wash 4 cups of white rice 4-6 times until the water is clear. Soak rice for 4 hours in a small pot. Heat rice on high for 5 minutes until it is boiling. Lower heat on medium and simmer for 5 minutes. Cover pot with lid and heat on low for 10 minutes until done.
  2. Cook rice in small pot on high heat
Rice Seasoning Instructions
  1. Add 4 tbsp white granulated sugar, 2 tbsp white vinegar, 1/2 tsp salt, and 2 tbsp water into a small bowl and mix thoroughly until all the sugar and salt is dissolved.
  2. Add 4 tbsp white granulated sugar
  3. Scoop hot white rice in a large bowl. Pour the mixture over the hot white rice and lightly mix with a spatula so the liquid is evenly spread. Remember, freshly cooked rice MUST be used and it MUST be hot before pouring the mixture into it. Cold or day-old rice will make the gimbap taste hard and stale and should never be used for gimbap.
  4. Scoop hot white rice into a large bowl
Gimbap Rolling Instructions
  1. Lay out gimbap ingredients, seaweed sheets, and sushi rolling mat on a large table. Place a single sheet of seaweed on the bamboo rolling mat and spread a thin layer of white rice using chopsticks. Place each ingredient in the center of the white rice. Slowly roll the mat over and over until all the ingredients are pressed towards the center of the rice. Continue rolling the mat over until the roll reaches the end of the seaweed sheet and the roll is tight and round.
  2. Lay out ingredients and mat on table
  3. Place finished rolls on a cutting board and place a cloth over the rolls to prevent them from drying out.
  4. Place finished rolls on cutting board
     
  5. Wet the edge of a knife with cold water. Slice each roll into 1-inch pieces and place on a serving dish. The freshest made rolls always taste the best!
  6. Wet edge of knife with cold water
     
    Place in serving dish